Thursday 27 October 2016

HOW TO CROCHET A FLIP FLOPP SLIPPERS PART 2(THE ATTACHMENT PROCESS)

Good evening  friends its been a while since i last posted that is because i have beeb busy with production of my new collections of footwears, but now I am back I have got alot for you guys.so stay clued to my blog got get the latest crochet patterns for my new designs.
   Today's tutorial  I am going to share with you how to attach your crochet flip flop to a sole. It is a continuation of my blog article.How to crochet a flip flop slippers
Note: for the attachement process its not same type of flip flop slippers i used but it is the same process of attachement for all kinds of flip flops.
MATERIALS:
1. Sole.
2. Insole.
3. Industrial gum.
4. Hand brush.
5. Hammer and Nail.

 Step 1: Take your insole and then mark out the point of attachment using your hammer and nail.

Step 2: use your hand blade to cut our the markings.

Step 3: now insert your top designs into the points of attachments.

Step 4: place it into a lasts (this helps you in getting the the actual sizing you want to for your slippers)

Step 5: add your industrial gum to both your insole and sole leave for about 10- 15minutes to dry then gum them together.


Your complete  crocheted flip flop is all set.

Thursday 13 October 2016

HOW TO CROCHET A BOWTIE HAIR BAND


Good morning friends. The last article I did about this crocheted hair band was on how you could use in on different , today i am gonna be showing you how to make yourself.
MATERIALS:
crochet hook- size 4mm.
Twine tread- size 9(folded into 4 to get desired thickness).

THE BAND.
Ch10 and sc across the row. Ch 1 and turn over to the 2nd row , continue this until you get to a length of 10 inches(this is the average size of of band for an adult, you could do more or lesser length it depends on the person you are doing it for.)
When you get your desired length you could attach both ends with tread and needle or attach bottons and botton holes to them.
 THE BOWTIE.
Ch 12 and sc  around the row ,ch 1 and turn over to the 2nd row continue this until you get to a length of 5.5 inches .when you get to your last row sc around it( this gives it a neater edge ).

THE SMALLER BAND.
This is the band that would be use to attach the bowtie to the band.Ch 3 and sc across the row .ch 1 and turn over to the 2nd row , reapeat this until you get to a length of 3 inches .
    Take the band and bowtie and attach them together with the smaller band with the aid of a tread and needle.
     Your crocheted bowtie hair fband is all set you can see I am ready to rock mine to work.
     To get free tutorials sent directly to mail please do ensure to subscribe or like us on facebook ( Alvin's Glam Knitted Wears).
    Love you guys, do have a great  day ahead.


Sunday 9 October 2016

HOW TO ROCK YOUR KNITTED HAIR BANDS ON DIFFERENT OUTFITS, HAIRS, AND USE THEM AS DESIGNS FOR HATS.


Happy sunday friends today i will be doing something quite different from the normal tutorial sessions we normally have to all the fashion lovers i am going to be showing you guys how you could rock on knitted hairbands on different outfits, hairs and also use them as designs for hats.

 The first outfit on our list is the office wear. You do not want to go the all simple to the office you could just add your knitted hair band and wedge sandal to give your outfit a little edge.
 The second outfit on our list is the lovely ankra gown rocking your knitted hairband and wedge sandals on this just gives you that elegant look and sure makes you the centre of attraction at the function you want to attend.

 Today i rocked this outfit  to church and i totally slayed it i got lots of compliments.My hat was plain i had to use my knitted hair band to design it and the outcome was so lovely. You could try these on your plain hats .
 So when i got back from church i started trying my other hair bands on my other hats. I tell you it couldn't have gotten any better.

 I also tried  the hair band on my afro wig like I expected i slayed it again.
It also came out fine on my short fridge wig .
      For more fashion tips on how to rock alvin galm's knitted wears stay tuned to my blog next week sunday. Please do subscribe to get free tutorials notification directly to your mail. The tutotial on how to crochet this bowtie hair band would soon be out. Love you do have a lovely day.

Tuesday 4 October 2016

HOW TO CROCHET A FLIP FLOP SLIPPERS.

 Good day friends how did your weekend go and for those of us in nigeria how did you spend your indepedence holiday for me i spent most of it working on these flip flop slippers pattern i am going to be sharing with you.
   This tutorial session is going to be very detailed and educating hope you enjoy it.
     This tutorial session is divided into 2 parts. The first parts i am going to show you how to crochet the top design, while in the part 2 we will learn the attachment of the top design to the sole . So please stay clued to my blog you cannot aford to miss it is packed full.
MATERIALS:
1.Crochet hook- size1mm
2.Twine tread- size 9 (folded into 4 parts to achieve desired thickness).
3.Tread and needle.
bottons.
4. Shoe soles.
5. Measuring tape.

STEP1: i) ch5 and do a slpst at the 1st ch to form a ring.
ii)ch 1 and do 9sc into the ring slpst at the 1st stitch.
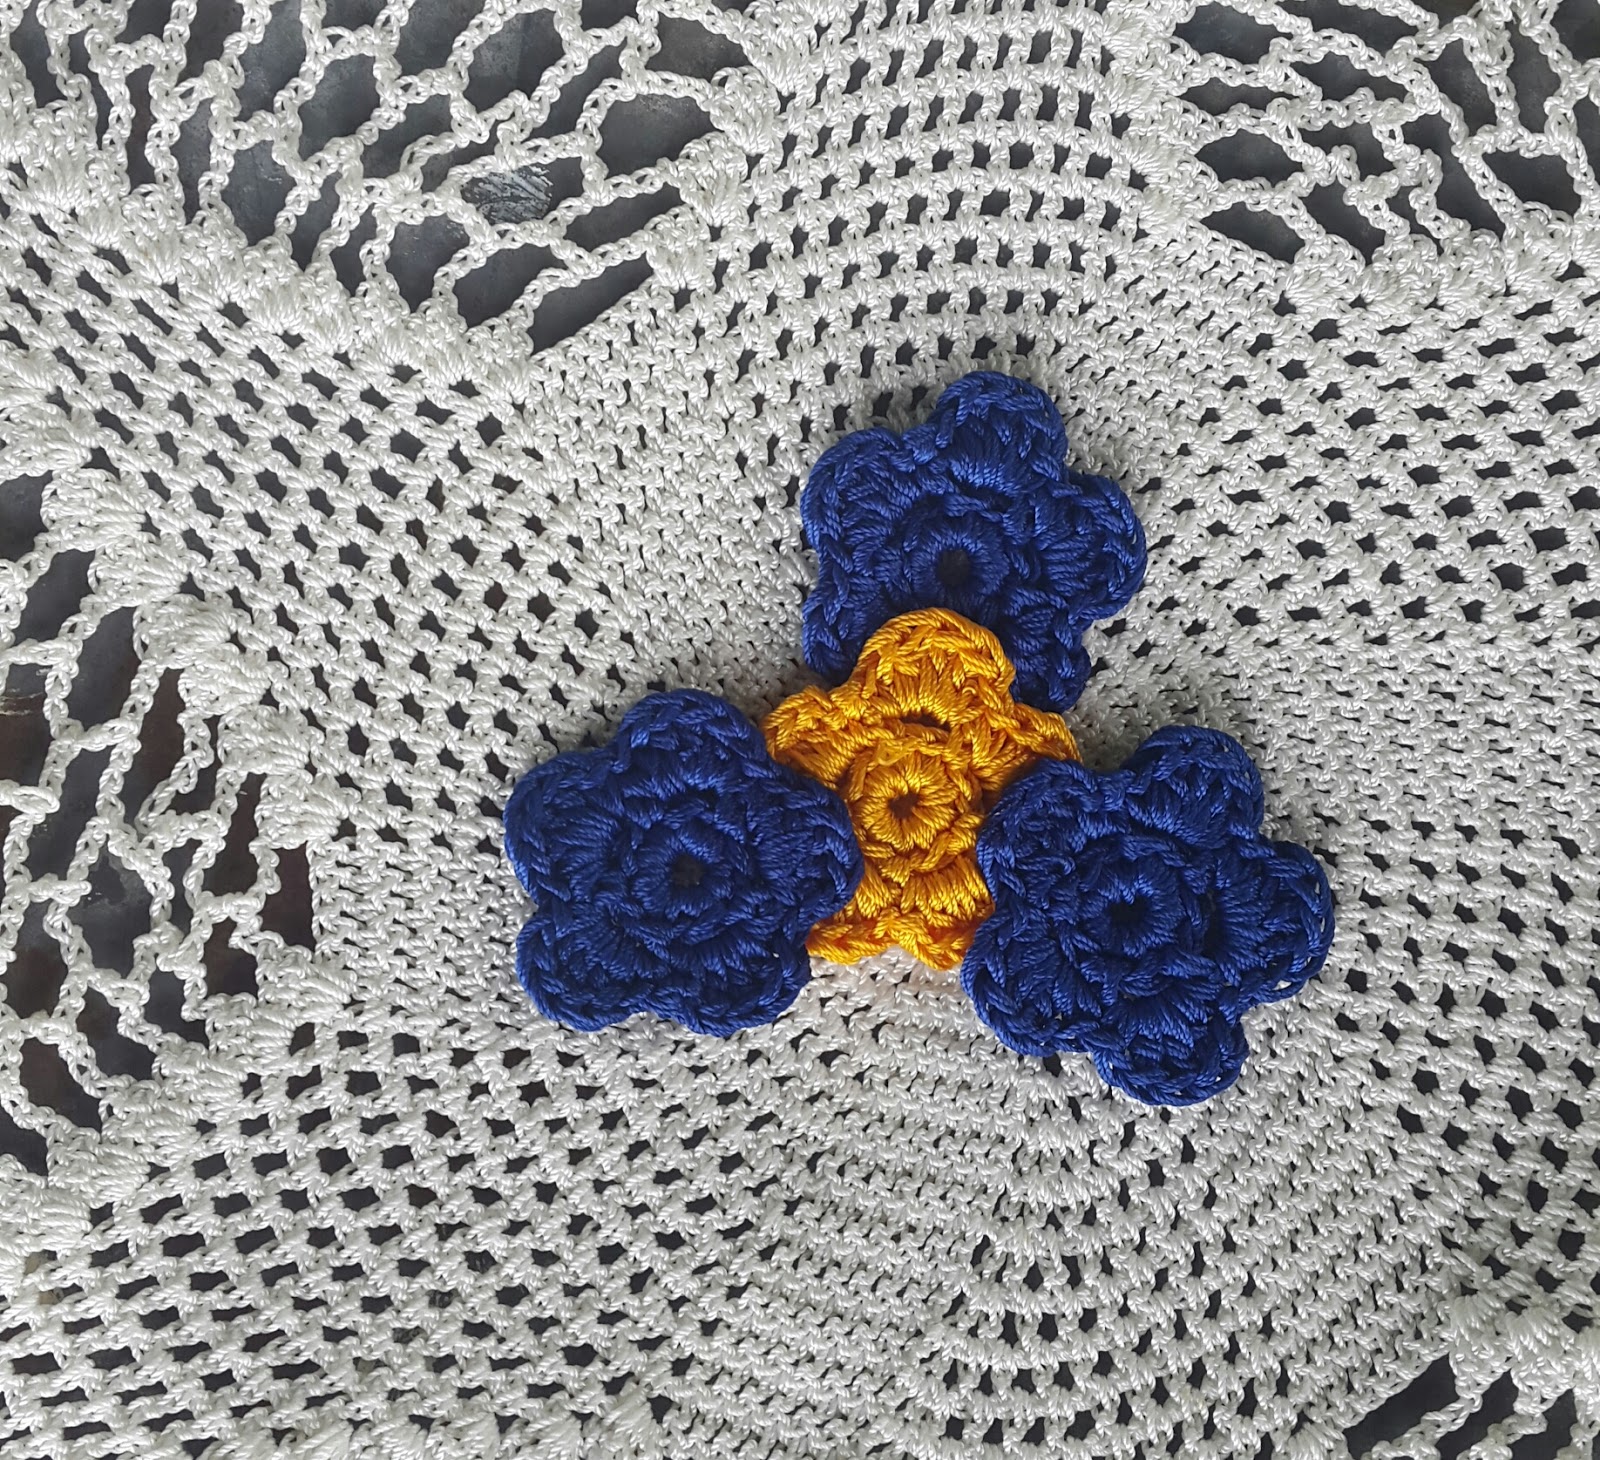
ii) ch 4, skip a stitch and sc in the next stitch , ch 3 skip a stitch and sc in  the next stitch repeat this 3 more times and slpst . Then you petal is formed as seen in the diagramme below. Make 3 more petals which makes the total number of petals we are going to use for the slippers 4.

 STEP2: i) now arrange the 4 petals in the form of a slipper shape and attach them with tread and needle.
 ii) while attaching the petals together , after attaching the 1st 2 petals you dont have the cut the tread away all you need do is to run the tread through the back of the petals to your next point of attachment as seen in the picture below.

 ii) Afterward you attach your bottons in the middle of each petals , also do not cut the tread after attaching each bottons run it through the back of each petals until the completion of the attachment.
 STEP 3: i) Attach your tread to the 3rd segment of  petals at the side( counting from the point of attachment from the middle petal). See picture below for  clear understanding . and then ch2 and 4sc across 3rd segment ch 1and then 4sc across the segment repeat this until you get to a lenght of
 3 inches then cut and tie your tread. Repeat same for the other petal at the side.
ii) Afterwards attach your tread to the 3rd segment of the petal at the top(see 2nd picture for clear understanding.) Ch2 and 1sc, ch1 and sc repeat this until you get to a length 2.5 inches cut and tie you tread. Please note always remember to burn you cut tread to prevent it from loosing.


 And then your crocheted flip flop is ready for coupling or attachment to a sole. Guys this is where we would stop for today's tutorial. I would be taking you guys on the part 2 next time.
    Please follow us on facebook (@alvinglam)
for new updates on the latest tutorials thanks.

CROCHET LAPTOP BAG PATTERN

Click  here  to download pattern